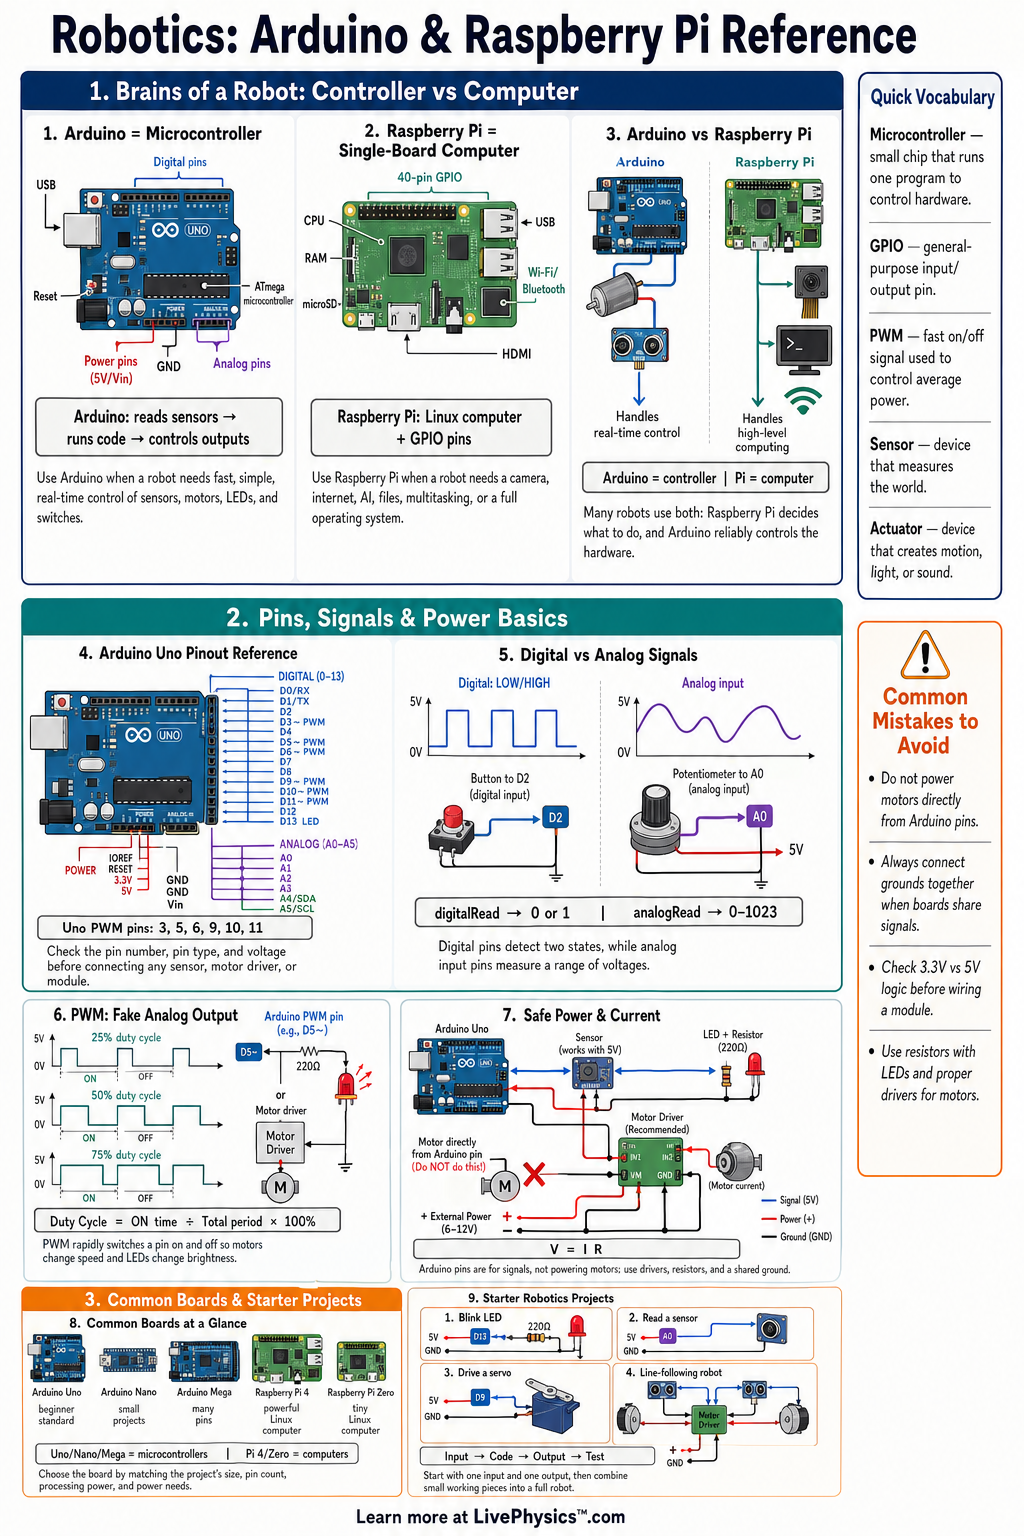
This cheat sheet covers the basic hardware, wiring rules, and code ideas students need when building robots with Arduino and Raspberry Pi boards. Arduino is often used for direct control of sensors, LEDs, servos, and motors, while Raspberry Pi is a small computer used for programs, cameras, networks, and higher-level control. A quick reference helps students check pin types, voltage limits, and common formulas before connecting parts.
It is especially useful for classroom robotics projects where safe wiring and clear troubleshooting matter.
Key Facts
- Ohm’s law is V = I x R, where voltage V equals current I times resistance R.
- Electrical power is P = V x I, so a 5 V device using 0.2 A consumes 1 W of power.
- An Arduino Uno uses 5 V logic on most digital pins, while Raspberry Pi GPIO pins use 3.3 V logic and are not 5 V tolerant.
- A digital pin reads or outputs two states, HIGH and LOW, while an analog input reads a range of voltages using an analog-to-digital converter.
- PWM controls average output power by switching rapidly, and duty cycle = on time / total period x 100%.
- A typical hobby servo uses a control pulse about every 20 ms, with pulse widths near 1 ms, 1.5 ms, and 2 ms for different angles.
- Motors should be powered through a driver board or transistor circuit because microcontroller pins cannot safely supply motor current.
- All connected boards and external power supplies must share a common ground so signals have the same voltage reference.
Vocabulary
- Microcontroller
- A small programmable chip, such as the one on an Arduino, that reads inputs and controls outputs in a circuit.
- Single-board computer
- A complete small computer on one board, such as a Raspberry Pi, that can run an operating system and programs.
- GPIO
- General Purpose Input Output pins are programmable pins used to read sensors or control components.
- PWM
- Pulse Width Modulation is a method of controlling average power by rapidly switching a signal on and off.
- Sensor
- A sensor is a device that measures a physical quantity such as distance, light, temperature, or motion and sends a signal.
- Motor driver
- A motor driver is a circuit or board that lets a low-power controller safely switch and control a higher-current motor.
Common Mistakes to Avoid
- Connecting 5 V signals directly to Raspberry Pi GPIO is wrong because Pi GPIO pins use 3.3 V logic and can be permanently damaged by 5 V.
- Powering a motor directly from an Arduino or Raspberry Pi pin is wrong because GPIO pins supply only small currents and motors can draw much more, especially when starting.
- Forgetting a common ground is wrong because sensors, drivers, and controllers need the same reference voltage for signals to be understood correctly.
- Reversing LED polarity is wrong because an LED only lights when current flows from anode to cathode, and it can be damaged if used without a proper resistor.
- Mixing up analog input and digital input is wrong because an analog sensor may output a range of voltages, while a digital pin only detects HIGH or LOW states.
Practice Questions
- 1 An LED circuit uses a 5 V supply, a 2 V LED drop, and a desired current of 0.02 A. What resistor value is needed using R = (Vsupply - VLED) / I?
- 2 A robot motor uses 6 V and 0.5 A while running. What power does it use in watts?
- 3 A PWM signal is on for 3 ms during a 10 ms period. What is the duty cycle as a percent?
- 4 Why should a Raspberry Pi often be paired with a motor driver or Arduino in a robot instead of connecting motors directly to its GPIO pins?
Understanding Arduino & Raspberry Pi Reference
Pins are not all interchangeable, even when they have the same connector shape. A pin can be set as an input, an output, or a special function such as serial communication. An input listens, so it must receive a clear voltage.
An unconnected input can float between states because it picks up electrical noise. This causes random button presses or unreliable sensor readings. A pull up or pull down resistor gives the pin a default state until a switch changes it.
Outputs need extra care. Two outputs connected together can fight if one tries to send a high voltage while the other sends a low voltage.
That can damage a board. During startup, some Raspberry Pi pins may briefly change state, so motor and relay circuits should be designed to stay off until the program deliberately enables them.
Sensor values need interpretation before a robot can use them well. A light sensor, potentiometer, or distance sensor rarely gives a perfect value. Readings change with room lighting, battery level, surface colour, temperature, and loose wires.
Calibration means recording the values seen in real conditions, then choosing useful thresholds. For example, a line following robot should measure both the dark line and the floor before deciding what counts as black. Many Arduino boards can measure a changing sensor voltage directly.
Raspberry Pi GPIO pins cannot measure ordinary analogue voltages on their own, so an external analogue to digital converter is needed for those sensors. Check every sensor output before wiring it to a logic pin. A resistor divider can reduce a slow voltage signal, but it is not a substitute for a proper power circuit.
Motors create problems that LEDs and small sensors do not. A motor may draw a modest current while spinning freely, then draw much more current when starting or when a wheel is stuck. This is called stall current.
Choose a driver, battery, wires, and switch that can handle that larger current. When a motor stops, its magnetic field collapses and can create a voltage spike. Driver boards often include protection for this effect.
A transistor circuit needs a flyback diode placed correctly across the motor. Motors can put electrical noise into the supply, causing a board to reset or a sensor to report nonsense.
Keep motor wires short where possible, use suitable capacitors near the supply, and keep high current paths away from delicate signal wires. A battery that works for an LED project may fail quickly in a moving robot.
Good troubleshooting is a sequence, not guessing. First inspect the circuit with power disconnected. Check wire placement, component direction, and exposed metal that could touch another connection.
Then measure the supply voltage between the power point and ground. Test one part at a time. Make an LED blink before adding a sensor, print sensor readings before controlling a motor, and test a motor driver with a simple fixed command.
If a value changes unexpectedly, gently move the wires to find intermittent contacts. PWM settings matter too. A low frequency can make a motor buzz, while a very fast signal may not work well with some devices.
Long programs on a Raspberry Pi can have small timing delays because its operating system runs many tasks. For highly regular pulses, a dedicated controller is often the safer choice.